Wednesday 22 February 2012

Who needs drawers when you can have shelves

The best thing about D.I.Y is creating something new out of something old and neglected. Changing something from what it should be into something that it never knew it could. Having an open mind is essential in winning the battle of the recreate. Back in the day when I was residing in Vancouver I moved into a house that needed curtains - it just so happened that the wall coverings for the window display at work were coming down and were headed righteously for the trash. I swooped in and salvaged these light purple, semi sparkly yards of over processed synthetic fabric from a shallow dumpster grave. I brought these babies home, sewed some loops at the top for the rod to slide through and added wide stripes of black house paint to the already ridged material with a busted up paint roller. Let dry and C'est Magnifique! They were the right length, they were the correct width and they even kept the alley lurkers from peering in at me while I watched Extreme Makeover Home Edition and wept in amazement at how they continued to change the lives of so many with overindulgences and a mega phone. 


That was over ten years ago and my skills have become slightly more broadened but it was still a pretty stoked feeling to know that I contributed to my house and didn't have to sacrifice my non-existent  pennies to do so. 


Since we're still working towards putting the finishing touches on our son's new room, there has been a lot of new additions being crafted. I really like this shelf that we did out of old dresser drawers. It's fun and since we already have a shelf type box for books, it didn't matter that the depth of the drawers weren't totally ideal for novels and the like. 


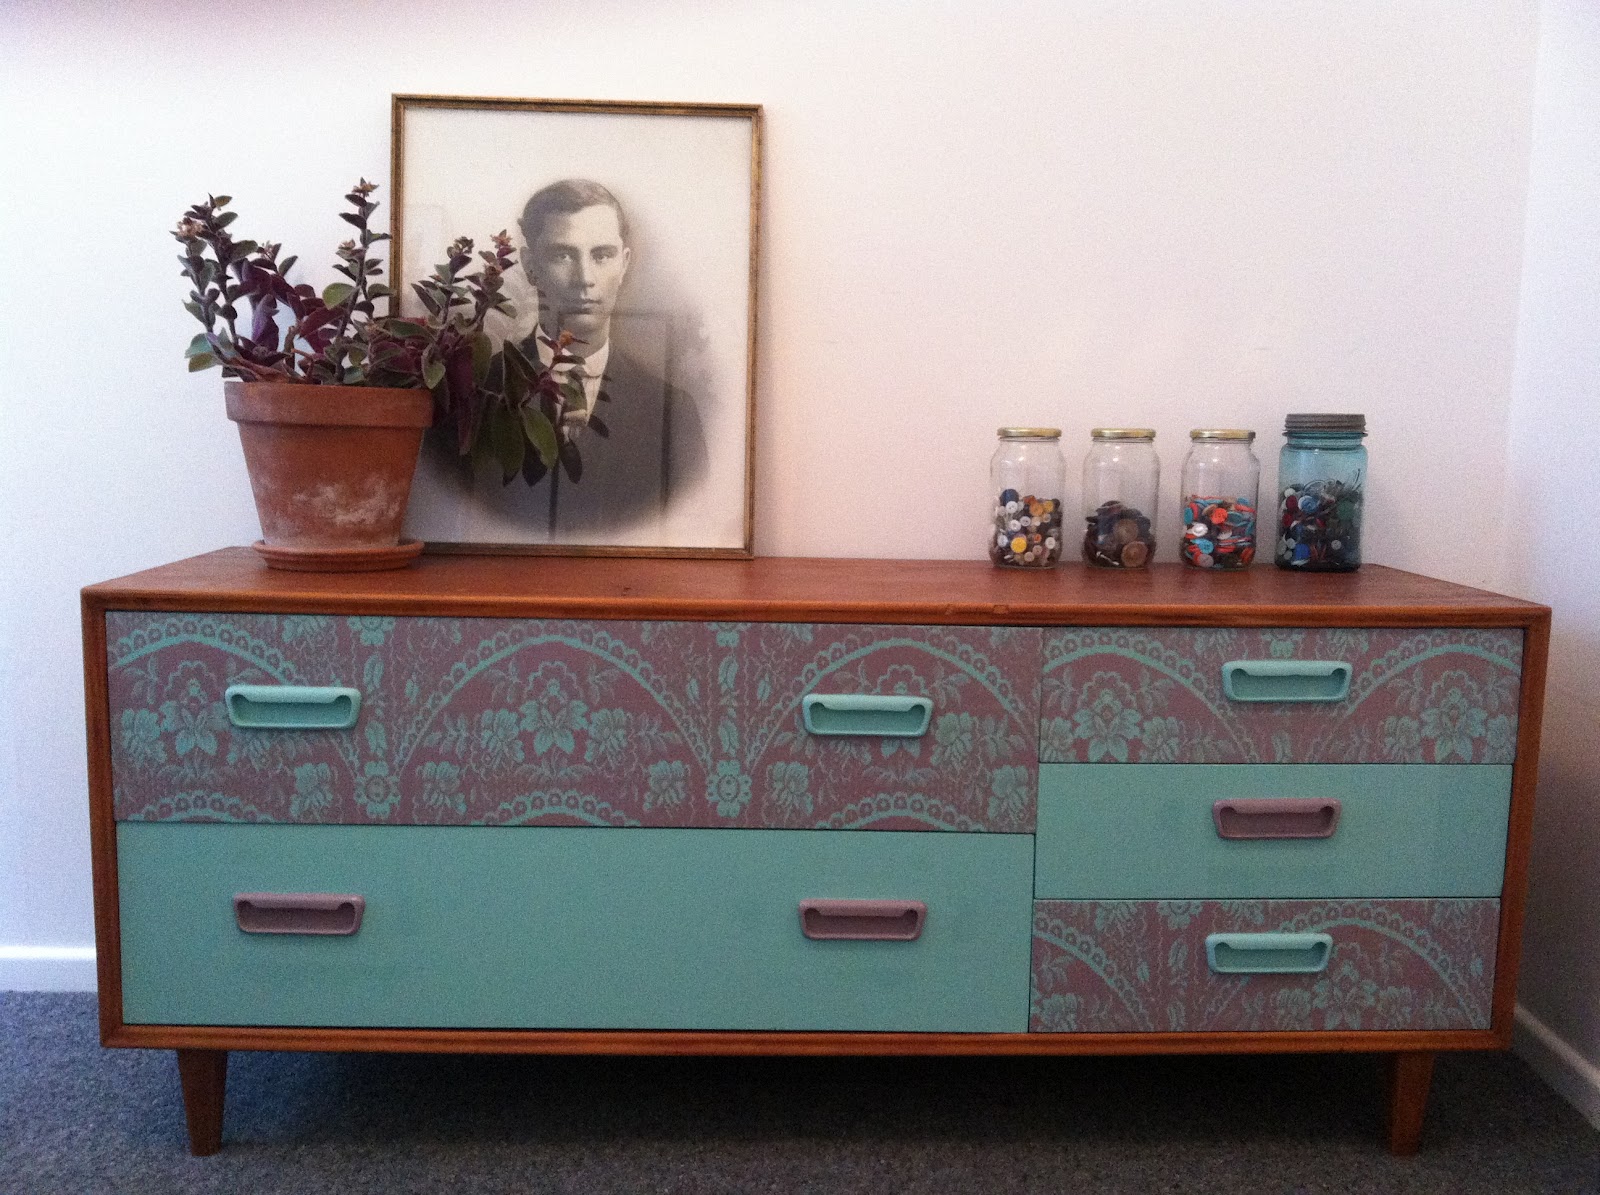
I managed to come across 4 old drawers that were being sold for $6 off the internet - they were perfect. I had an old dresser in the garage that's shape I wasn't totally sold on but kept as a "just in case" item. I am so glad I fought the husband's pleads to discard off for those extra few weeks because two of it's drawers were just what I needed. All together I had six drawers - 4 different styles and shapes. I organized them on the ground to find the shape that I was keen on and popped off the handles that weren't necessary. 


I gave all the drawers a light sand but kept the outsides natural/multiple colours to make it obvious of what they were in their past life. We made some small shims to help the drawers fit snug up against each other and to get a nice tight hold when we screwed them together. By screwing them together it made the drawers into one nice easy to handle shelf. Add in as many or as little screws as you want, totally your call. I gave the insides some white and got Hayden to paint on some designs of relevance to my child's currant fascinations. 


Because the back (old bottom) of the drawers were sunken in a bit, when attached to the wall there would have been a gap, making the shelf not fully flat and secure. We cut some small squares of wood and using wood glue adhered them to six spots around the back where we wanted to place the screws through to the wall. This made the whole unit nice and flat and virtually unmoveable. 


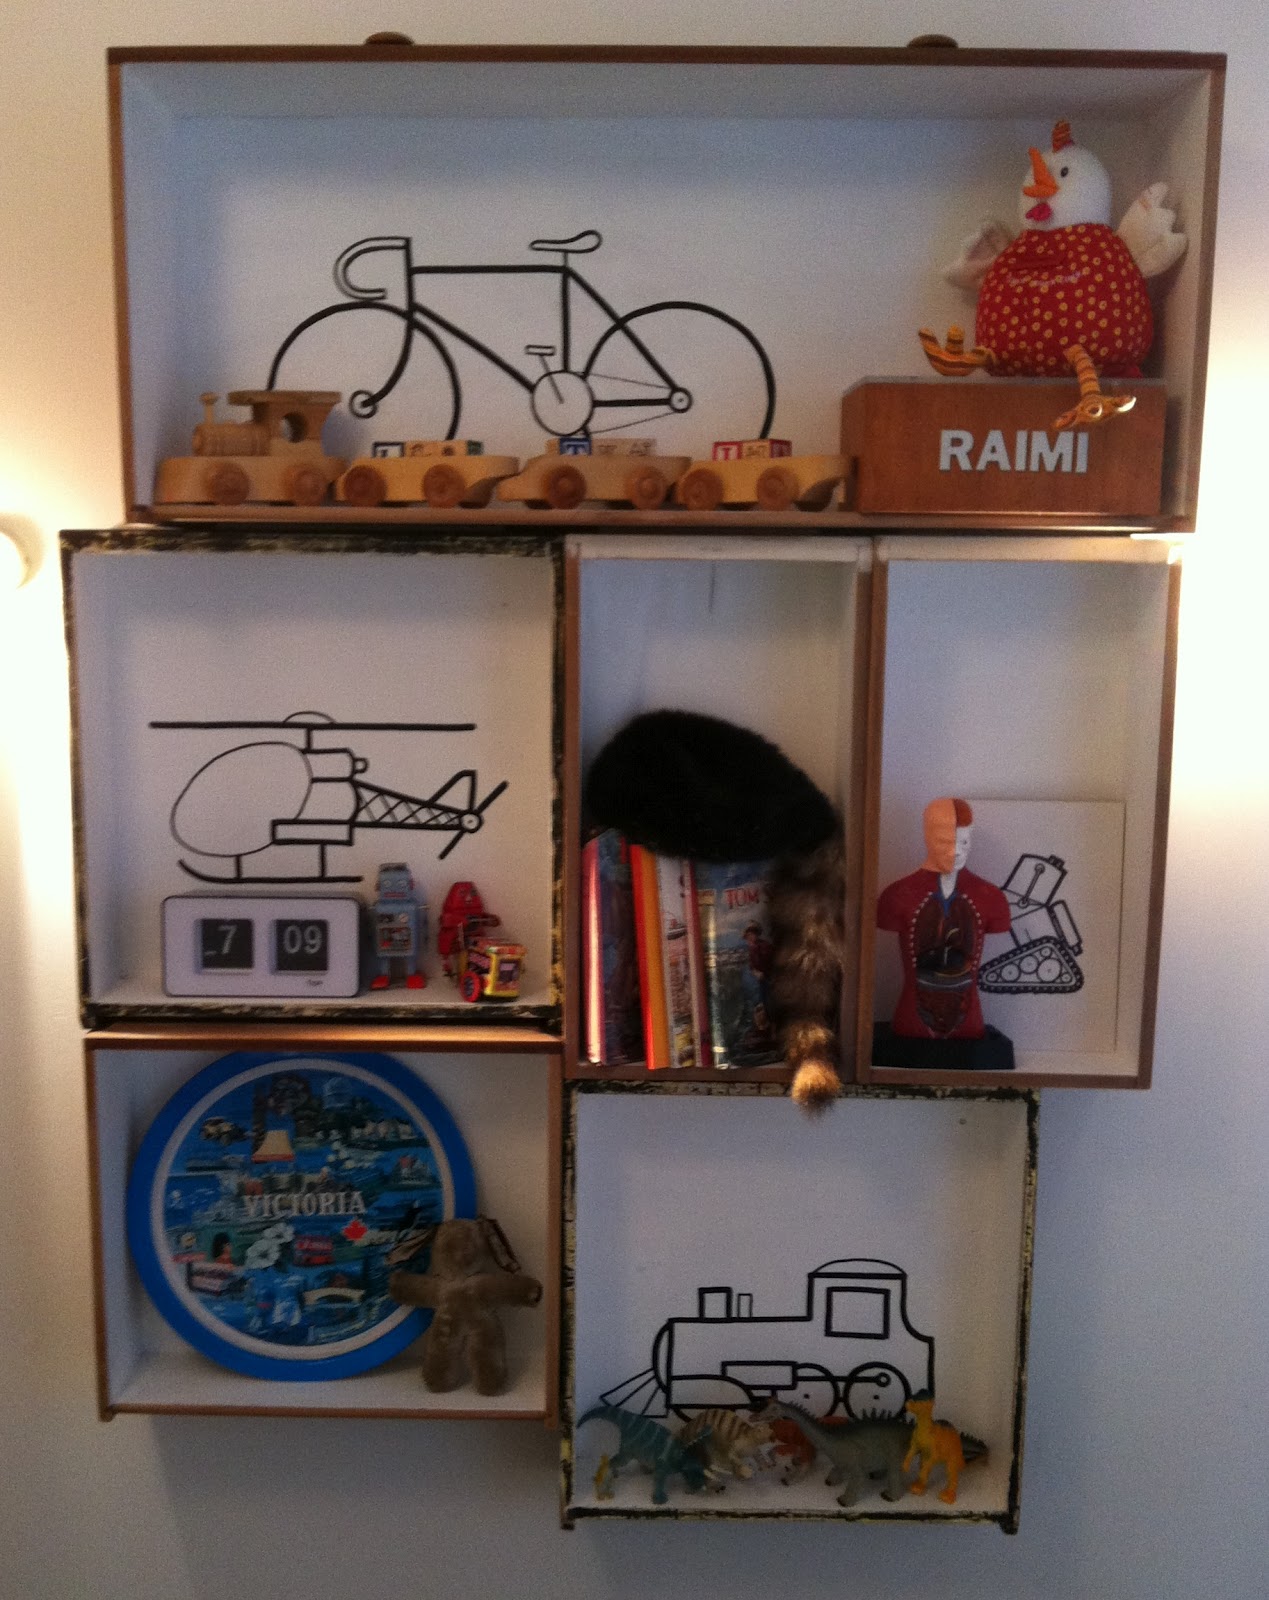
I added some of my son's wears strategically amongst the new shelves hoping that he has fallen out of love with each piece that fits to my taste. I find I try to hide my sadness every time he throws things on the floor or rearranges to his unseasoned liking but he's a kid and he's a rad kid who's just beginning his own lessons in the art of design and destruction.   

Sunday 12 February 2012

Back from my bloggers grave

My extended hiatus has come to a close. Mostly due to popular demand and slightly elevated energy levels, I have returned to reclaim my post as some what of a do it yourself connoisseur.  Though the keyboard has been out of the loop for quite some time - the ideas and creations have been feverishly surging through my family's limbs at an uncontrollable pace. With the arrival of our sequel child due in June, we have been overwhelmed with rad ideas and revamps - transforming an old room to a new room and a spare room to a toddlers room - the possibilities have been unbelievably endless. 


On the same level as my excitement for having a new kid is my elation for having an excuse to buy second hand furniture that I can dust off and transform into new greatness. My husband's distaste for garage clutter and joy for the dismantling of space over-stayers always hinders my reasoning for buying without a purpose. I now have the upper hand and even a small portion of the surfboard, weight bench, work station ridden garage at my leisure. 


A few weeks ago we ventured out to Trash Palace in Tawa. It's generally a dumping ground for the unsalvageable but if you dig deep enough and make a few passes around the joint, you might stumble upon a cubic zirconia amongst the mounds of utter crap. And low and behold - I did. A mouldy set of broken drawers with legs, height and handles I adored. The man at the counter was asking way too much but with a ginger husband at the bartering helm (and the additional purchase of a set of training wheels) we snagged up our toxic mess for just over $10.


A week later I donned my pregnant lady's mask of safety and started the dressers journey for new life. 


Everything got a good sand and the outer shell got a few new coats of varnish. Gave the drawers a couple coats of the green paint that I picked up in test pot size for $5 at the local hardware store. Seriously people...if you can buy test pots - do it! Best deal ever. 


After the green was fully dried I masked over the handles of the drawers I wanted to have the lace print on and masked around the handles of the ones I didn't. I painted the handles of the non-patterned drawers purple and placed the lace (grabbed from the thrift store for $5) across the left overs and cut out where the handles sat so the lace would lay flat. I gave them a light spray paint and pulled the lace off right away but very very carefully. 


I unmasked everything and that's it! Super stoked on how it turned out. The new little lady's room is going to look really rad with this in it. 


Friday 4 November 2011

Half Canadian Halloween

Halloween was such an awesome day back in my hometown. We would get all dressed up in our elaborate costumes that were stretchy enough to fit our one-piece snow suit underneath and that didn't look ridiculous with winter boots on full display, get all painted in gooey make-up - that would most likely end up on every surface of the house before you even stepped a foot near the great Halloween outdoors. We would take our best empty pillow case and only dream that we (or rather the parent that was chaperoning us door-to-door) could last long enough to jam it to it's brim. We would hit every house in multiple neighbourhoods and were just as excited about a mini bag of peanuts than we were about a handful of tootsie rolls...even the pen my aunt gave us one year was heart skipping. I loved getting home at the end of an exhausting, blister forming ghoulish adventure to sort through my loot and into piles of: eat now!, eat next, eat maybe later, and I hope mom eats this (or at least takes a bite out of it and throws the rest away). Going to school the next day was so much fun, you got to trade and show off the spoils of your hard nights trudging and probably get on the teachers nerves for the lack of attention they were receiving...or maybe they wrote off November 1st and just played Simon and Garfunkel while pretending we had all disappeared. 


New Zealand seems to be catching on to the joys of Halloween more each year I reside here. I remember seeing a sign a few years ago that made me a bit sad, "Halloween is NOT a New Zealand tradition - Don't knock on my door!". Geez. But this year people seemed to go a bit buck wild and it was awesome! Maybe it was the fact that Raimi semi understands that if he knocks on a door he might get some candy or maybe it was just the thrill that dressing him up makes him even more hilarious - either way we had a bit of excitement on that evening of ghosts and goblins. 


As the world knows, we do things the inexpensive way around my house...
So, to make your small child into a half Canadian lumberjack all you will need is: One plastic axe from the $2 shop (was actually $3.50 but who's counting?), a not so hard hat from the same $2 shop (was actually .99c but again, who's counting?), one flannel shirt that will be too small for him next winter so the sleeves get the chop, one sleeveless denim jacket - more stains the better, one pair of cut off denim shorts (Canadians love denim and cutting things off - see my post on the denim tea cosy, it will help you understand), and one pair of working man's boots. Put it all on the right parts of the child's body and off you go! 


*Note: We only went to three houses and the shorts had pockets so he didn't need a bag. And plus, he's only 2 and a half! I would have ended up eating all the candy anyways!


Sunday 30 October 2011

Pikliz if you please

With being a family of tight pockets, we live a life satellite TV free. I know this isn't uncommon or completely backwards to the average person's existence but you do someday's feel a bit out of the current affairs loop. The three free channels that we can partially acquire through busted up bunny ears are jam packed with boring, brain melting unworldly nonsense. Generally to turn off the TV and get down on some husband and wife painting/crafting is easily our first choice but when you have spent your day with a racing mind and busy hands, zoning out one someone else's life adventures is elevated into pole position. 


Recently, in desperation to fill my mind with something other than New Zealand dramas or border patrol - I (quite possibly) illegally downloaded the most current season of Anthony Bourdain's No Reservations. I smashed two to three episodes a night and felt envy and delight with every mouthful of cultural delicacy Mr. Bourdain took. One of my all time favourite locations that he visited was Haiti. The most amazing looking food. It was all simple, basic but the ingredients that they used were jam packed with flavour and when put together with the right tasty buddies they absolutely hollered at you with deliciousness. One thing that they seemed to have with most every meal was Pikliz (pick-lee-z). Spicy pickled uncooked vegetables. So easy and as I can now vouch for them myself, so so amazing. 


Take half a cabbage - shred, two carrots - sliced how you desire, 1 onion - sliced, 6 garlic cloves - lightly crushed and peeled, 3+ habanero peppers (use more if you want it with super heat) - sliced in half, 10 peppercorns, 3 teaspoons salt. Get this all mixed up in a large bowl. Cram it all into a large jar(s) and fill with white vinegar - no heating required. Make sure to press down on the vegetables to make sure all the bits are covered. 


Once filled, chuck into the fridge for 24 hours before you consume. Have along side some dirty rice and slow roasted pork for optimal results.  


Monday 17 October 2011

Oat and coconut tantrum tamer.

Reason for the oversized gap between posts - my son is two and a half going on puberty ridden 13 year old teenage girl that thinks that whole world is battling against her. Any suggestion - and I mean ANY suggestion - is met with resistance and unbridled fury. "Hey Raimi! Wanna go to somewhere that you really enjoy with people who's company entertains you and food that is normally on the restricted list?!", "NO WAY!" "What about going to pet some fluffy bunnies and kittens while eating candy that is coated in sprinkles and love?!", "NO WAY!". Dinner time takes a piece of me with every tantrum unnecessarily torpedoed in my direction. "No _____ anymore!" is thrown around like it is the only phrase he speaks. As much as our exhaustion encourages us to bow down to his every whim, our desire for a polite, vegetable loving pre-teen rises from the ashes, calmly kneels down to place the young child in the naughty chair for 2 minutes, waits for a "sorry" to be heard and an agreement to return to normal society to eat his god-damn lasagne!


On days when the tension is running rich, the only desirable fuel that can bring this family to a quiet standstill is that of a warm and crumbly muffin of calmness. Filled with oats and coconut this muffin makes my heart sing with the joys of the future and the passing of this toddler independence struggle. 


Combine one and 1/4 cups of boiling water with one cup of uncooked rolled oats and half of a teaspoon of salt. Let this soften for 20 minutes or so. Cream together 1/2 a cup of butter, 1/2 a cup brown sugar, one cup of white sugar and 2 eggs. Add to that 1 and 1/3 of a cup self rising flour and 1 teaspoon of cinnamon. Mix. Chuck in the oats and 1 and a 1/2 cups of coconut to this mixture. Cook for 25 minutes at 180c. I jammed a little square of chocolate in the middle of each muffin for a bit of extra goodness. 


Thursday 6 October 2011

Spiced pumpkin seeds and a bleeding heart

Whether bound by generational blood, fluttering hearts or open arms, the love that a family can give surpasses all other. A family - no matter how it is constructed - supplies you with safety, with understanding, a quiet hand to hold or even just an ear. Judgement is always short lived, with compassion and a care filled soul righteously taking over the lead position. My family has always been the protectors of my bleeding heart. They shelter me under their wings and guide me to an unbiased corner of our world to help repair any troubles my fragile being may have. The love that I have for my family - old and new - is of an immeasurable amount. And I wish I shared this with them more often than I do. 


Might be strange to now start talking about pumpkin seeds but it's a memory that I often return to when thinking about my childhood. I can picture my sister and I scooping out the seeds and slime from the belly of a carve-able halloween  pumpkin - being grossed out by it's consistency yet excited about the deliciousness we can create from it's little seedy bits. I miss being within arms reach of my sister. She has supported me through many a tough feat - even my fear of what lurks in the depths of a pumpkin.


In a bowl or grinder blend together 1/2 teaspoon smoked paprika, 1/2 a teaspoon sea salt, 1/2 a teaspoon brown sugar, 1/4 of a teaspoon ground smoked chipotle, 1/4 of a teaspoon black pepper, and a 1/4 of a teaspoon garlic powder. Set aside and coat 2 cups of dried pumpkin seeds with 1 teaspoon of olive oil. Add some of the spice mix to that - little at a time to suit your taste. Throw the spice covered pumpkin seeds on a lightly oiled baking sheet and cook in a  150c oven for 20 minutes or so. Check them often to ensure they are not burning. 


Once they have exited the oven in good health, chuck them in a bowl, let cool, and devour. 


Sunday 25 September 2011

Lemon curd's the word

Back when I called Vancouver my home I did something on a slapstick embarrassing level higher than any other (for me at least). On an all too common trip to the supermarket with a close friend of mine to gather the fixin's for a good meal, I spotted a heard of lemon meringue pies that summoned me to adopt their prettiest leader. I gingerly plucked this well crafted, stiff peaked, tartness filled gods creation from the table with both hands caressing it's sides. I walked  with care to our next isle of need, being sure to look up at the descriptions posted above each row to minimize potential time wastage...and then it happened...almost at the path I needed turn down...I walked straight into a low-lying empty pallet, tipping me swiftly towards the ground, forcefully landing on my knees and elbows, catapulting my newest love high into the air only to land on her top and careen towards oncoming shoppers. Stunned, confused and highly embarrassed - mainly due to the fact that my friend abandoned me only to leave an elderly patron my only/best option in the assistance of the return to my feet, I scampered back to the table to not so lovingly snatch the next best adoptee and angrily pay for her at the next available disgruntled cashier. This treat that only moments earlier sent my blood pressure rising with delight, was now going to pay for my bruised knees and broken ego. I was going to eat it. I was even going to eat it before my meal and blame it for ruining dinner. 


This little snippet of memory from my youth comes rushing back every time I think of whipped meringue or that tangy lemon curd. I've never made a full lemon meringue pie before and since I am going out of town on vacation tomorrow, I wasn't about to make today my first. I opted for the simpler approach of making only the lemon curd goodness that I seem to enjoy the most out of the dessert anyway's. 


Mix up 6 tablespoons softened butter with one cup of sugar. Add in 2 whole eggs and 2 egg yolks to this mixture. Try and do that 1 egg at a time. Throw in 2/3 of a cup fresh lemon juice. This will look curdled but it will smooth out soon enough.


Pop this mixture into a pot and heat it on low. Whisk constantly until thickened, it should coat the back of a spoon. Try not to let the mixture boil. Once thick, take it off the heat and stir in a tablespoon of lemon zest. 


   Place into a bowl in the fridge with baking paper pressed against the top to avoid a crust forming. Let the lemon curd cool before giving it a home in a container with a well sealing lid. 


Thursday 22 September 2011

Robotic stress reliever

Life can be pretty emotionally overwhelming at times. Those lemons that were so graciously discarded on your doorstep can't always be forced into a positive batch of lemonaide. Yelling (to the universe) will help set some pressure free, a good blubbery sob on a shoulder of trust, and a creative distraction will help shatter the metior of stress that is crashing towards the shaky ground afoot. 


I am rather partial to the cry and craft combo. Turn on a film about love or cute puppies, throw in some wool and scrap fabric and in mere hours you'll have yourself a child-friendly toy filled with the discarded weight off my hunched inward shoulders. Being of the overly sensitive sort, I tend to dabble in the crafty creations more often than not. 


The most recent stress reliever was constructed for a friend of mine at work who is due to birth her first in less than enough preparation time. I like doing these stuffed toys - they have no rules and use up scrap material that I have a habit of squireling away. Plus I think it's fun for kids to have some home-made toys - even if they don't play with them...they still exude the love that assisted in their build.


Double up a piece of material large enough to make a decent sized stuffed toy. Draw out whatever you feel like sewing up. Seriously, you can do anything, as long as you have the patience to hand stitch it all together. After you cut that out grab some smaller pieces to make patches - or in this case since I was making a robot, I cut scraps to make a face, control panel and a bum pocket. Sew on some buttons and since I am partial to wool, I like to use that to make the mouth and other bits that make it more recognizable. 


Once you've sewn on your patches and such, you can start stitching your edges together. You can do this by machine or hand...I'm a hand sew person when doing the toys. I like the slight imperfections that it gives. Get it almost totally sealed - then stuff it and close 'er up. Done. Now you should be relatively stress free and a child will be blessed with a rad hand created toy. 


Thursday 15 September 2011

I cheese, you cheese, we all cheese for home made cheese!

Cheese. Friend or foe - it always soars ridiculously high of my must eat list. It's delicious, it's salty, it makes almost everything taste better. Cheese is filled with mounds of fat and calcium - one for your bones and the other for your butt. You chose which one you would like to obsess upon while gorging on it's cultured goodness. I frankly, don't think about anything but how satisfied my tummy is going to feel after I coat it with molten cheesy love. 


This cheese recipe is super easy. It's the only one I've tried so the only thing I have to compare it's difficulty to is not trying it. Not trying it was pretty easy but trying it totally has a tastier outcome. I suggest the latter of the two. 


Bring 3 litre's or so of whole milk up to a nice warm temperature - chuck in roughly two tablespoons of salt - more or less depending if you are adding in a flavour or not. Take it slow to avoid scalding the milk. Get it to a point where small bubbles start forming at the sides. Take it off the heat and throw in 1/3 of a cup vinegar or lemon juice (the cheese will not taste like vinegar if you decide on that acid). Your cheese should rapidly curdle - but could take up to 10 minutes. Your liquid (whey) will be yellow and your cheese (curd) will be white. 


If this doesn't happen the first time around (which it didn't for me) skim off what milk did curdle and give it another shot making your milk temperature a bit hotter or adding in some extra acid. 


Once you've got a good looking cheese curd, drain off the whey using multi layers of cheese cloth placed over a sieve. We grabbed one long piece of cheese cloth which was like a tube, tied a knot in the middle and pulled the bottom piece over the top one to create two layers. 


Let this hang out for 20 minutes or so and then remove the sieve and give the cheese a good squish down into the bottom of the cheese cloth. Wrap it around something that will let it hang in the air. 


Give your cheese a squish every once and a while to help get it's juice out. Ours hung for around 2 hours. It turned out quite good. Had the texture of Ricotta and was fantastic in a fresh salad from the garden. Next time I will add in some chilli, cumin seeds or even some fresh herbs. Have fun with your cheese, and your new chubby physique. 


Wednesday 7 September 2011

Shortbread the way Mother-in-law used to (still does) make it

This has been one of those weeks that really seems to be testing the patience I have worked so very hard to conjure up. A two day headache that just won't vacate, a child that is way too young for independence but feels that he should battle my every safety precaution, wardrobe choice, dinner creation, and my increasingly relaxed time schedule (and also acquire a cold while a new tooth is thrusting to the surface). My tolerance for unnecessary (to me) questions is at an all time low - which poses a challenge at work when you are plunked in the chair of query answering and problem sleuthing. Sleep is at a minimum and my bed seems so lonely with the husband away for work. But my problems are trivial. I realize this. My problems can be remedied with usually the simplest of things. And generally the most delicious of things. When I am feeling like an exhausted shlump of a lady I feel I deserve a treat. A nice rich dark Hot Chocolate and a home made cookie of choice. I usually prefer these cookies to be whipped up by hands other than my own but when the moment of desperation arises - I thrust myself at the challenge.  


*This is the third time I have made these cookies after two failed measurement conversion attempts (not all attempts were made tonight - that would send me to the mad house)


Edinburgh Shortbread - brought to you by my Mother-in-law Marion Scott. 


Pour 1/2 a cup of caster sugar on your counter top and work in 1 cup of butter with your hands. From a mound of three cups of flour (you have dumped this on your counter as well) knead in handfuls at a time until all the flour is gone and you are left with a smooth log of dough. 


This might take a while and it might seem like you have way too much flour - but you don't. The heat from your hands will continue to melt the butter and soften the mixture. Once in a log shape slice up some cookies. (I did place the log in the fridge for 5 minutes or so to firm up the butter a bit to help in the cutting - not in Marion's recipe - I do apologize for altering your generously tested technique).


Note: this photo is from a faulty batch - way too smooth - could be because it's almost a whole log of butter


Lay those cookies down on a tray and poke with a fork. Cook for 20 minutes at 160c. Give a sprinkle with sugar when removed form the oven and still hot. 

Note: this is the result you are looking for...trust me

Saturday 3 September 2011

This Father loves the Carrot Cake

Sometimes fathers get a bit of a raw deal. Mother's Day is put on the highest pedestal of all the little scattered throughout the year love giving commercial holidays. Mother's are pretty awesome and we totally deserve it but what about the sometimes deodorant wearing, forgot to floss, unkempt facial hair sporting Dad? Those guys need a fancy day of love too. 


My husband is a fantastic Dad. He is a master at breaking all of my frivolous rules yet still manages to not seriously maim his standing as the firm parent. The nightly father son wrestle is a highlight of their day, even though the weight class is greatly disproportionate - there is never a bad time for a jump on the bed or a castle creation of clutter and blankets. There is always love to be dished out and never a "too busy for a hug" to be heard. This father deserves a day of his own, no dishes, no cleaning (probably not even himself), and only minimal cooking (come on! I cook all week!). He can count on a decent Surf and possibly a sleep in - a slice of Carrot Cake and a freshly brewed coffee will be waiting at his leisure. 


*Someday's even a nap can wriggle it's way into the mix...generally I prefer it to be the other way around...  


Throw together 4 eggs, 1/2 a cup apple sauce, 1/4 of a cup oil, 1/2 a cup of brown sugar, 1/2 a cup of white sugar, two teaspoon of vanilla, about two teaspoons or so of lemon zest and about three cups of grated carrots. Give it a mix up.


In another bowl, put together 1 and 3/4 of a cup flour, 2 teaspoons baking soda, 2 teaspoons baking powder, 1/2 a teaspoon salt, 1 and a half teaspoons cinnamon and 1/2 a teaspoon nutmeg. Get this in the bowl with the wet stuff - good stir - and into a 175c oven she goes for 40 -45 min. 

Once totally cooled add a lemon cream cheese blanket over the whole cake if you wish...I wished. 

One block of cream cheese (about 1 cup) whisked together with 2 tablespoons of butter. Add in 3/4 of a cup icing sugar, about a tablespoon of lemon juice and one teaspoon lemon zest. 


Wednesday 31 August 2011

Self-saucing Vegan

My Omi is a seasoned baker. She would always have more than one thing coming out of the oven and they would always have more than one thing missing from their 50 or 60 year old memory recipe. I remember asking my mom one day when she arrived home announcing, "Omi's given us some cake", "What's it missing?", "Baking soda - but it still tastes good!" Whatever ingredient she accidentally bypassed she made up for in effort and love. She would always have food on her table or perpetually at the ready to be swiftly shoved into a grandchild's ever hungry belly. I will always remember this meatloaf sandwich that she made for me with German butter cheese and day old leftovers. Amazing. Meatloaf never tasted so good! I love food memories. Even if they were missing pieces or a little over done - they still leave you with that longing for them to return. 

We never made self-saucing pudding growing up. I have only been introduced to it's simplicity and deliciousness in the past couple of years. It's one of those things that makes you feel comfortable, safe, overweight. It is completely effortless - other than the part where you have to roll out of your seat to get a second helping before the cake sucks up all it's molten gooeyness. It is perfect. It is a memory maker.

*This version is Vegan - replace with animal products if you wish.

In the dish (with lid) that you are planning to bake it in, mix up one cup of self rising flour, 1/4 of a teaspoon salt, 1/2 a cup of sugar, two tablespoons cocoa, 1/2 a cup of soy milk, and 2 tablespoons melted margarine. It will look like a cake batter - I threw in a few squares of dark chocolate to make it taste even more amazing. On top of your batter sprinkle 1/2 a cup of brown sugar that has been tossed together with 4 tablespoons of cocoa. Pour over the back of a spoon (to avoid creating a hole in the batter) 1 and 3/4 cups of boiling water. Do not mix!


Pop your lid on and cook for 30 to 40 minutes in a 180c oven. The top will look like cake but all planet like and bumpy. Scoop out and eat when hot. Soy ice cream with this was beyond amazing. 


Monday 29 August 2011

As comfortable as curling up between two sheets of lasagne

upComfort is something I know a great deal about. If there is a stretch waist within a ten foot radius - I will slither myself straight into them. I'm like an airport drug beagle with a lust for the casual. When you stumble across me on holiday my uniform is loose and you better believe it, my appetite is even looser. The words "Whatever, I'm on vacation!" are on continual loop all the days I am away...and for a few thereafter. I like to eat and I love to eat good food. Food is to be enjoyed, to be shared, to some days even be devoured. The weather outside generally determines what I put on my families plates. I like to be crammed full of warm over indulgent coma inducing home style comfort food on cold and ugly winter evenings. And if you follow that up with a freshly out of the oven self saucing pudding, I could live out the rest of my days in a morbidly obese bliss. 


With my residing country currently being hampered with a winter chill and my time to construct daily dinners at a minimum, I like to ensure left-overs are present. This lasagne can be made big or small, vegetarian or not - you make the call - but no matter what you do, your belly will thank you for the comfort you are filling it with.


Make a tasty sauce by browning up some ground pork/lamb/veggie meat or just the following vegetables - onion, garlic, mushrooms, peppers/capsicums and I like to grate in a carrot for another hit of your 5+ a day. Once everything starts to get a bit soft throw in two cans of tomatoes - I like at least one of those to be whole peeled. Start to get your simmer on. Add whatever seasoning you are in to. You could do some thyme, oregano, basil, italian parsley, sage. I did a smokey chipotle, chilli, basil, oregano and the obvious salt and pepper. Let this get nice and rich - doesn't need to be too thick though - extra liquid will aid in the pasta cooking. In a bowl make up a mix of spinach and ricotta (200g tub) - salt and pepper that also. 


Once your sauce has some flavour, you can start your layers. I like to use a wholemeal lasagne sheet that needs no precooking. Start with a bit of sauce, pasta, sauce, pasta, spinach mix, pasta, rest of sauce and a sprinkle of cheese. These are not rules. Do as you wish. 


Cover with foil and cook at 200c until the pasta is fork tender - roughly 40 minutes with the foil on and another 10 minutes without to crisp up the top.  


Sunday 28 August 2011

Gourmet log cookery

A touch of OCD isn't always a bad thing. I believe in most cases it can work to everyone's advantage. Locking multiple doors multiple times - a secure dwelling, washing hands in clusters of three - always ensuring you have ceased the possible germ contamination in family dinners,  hoarding throw-away's for fear of not having an item that might someday be of use (but that's highly unlikely) - you are reducing your carbon footprint. I am by no means excluded from this lump of obsessive compulsive delinquents. My extreme is minimal but my extreme is still apparent. Not being able to sleep until I've checked once, maybe twice that I've turned the lock on the front door, my unkempt obsession with numbers, their sequence and how they will determine the course of...well...everything, and by no means least, my unadulterated list writing. 


I feel that none of these slight obsessions hinder me in my day to day ongoings - I can still make left turns without feeling anxious and I can still high-five without the need for gloves. One quirk I am having trouble shaking is my love for rolling food into a log like shape. Things seem to taste better like this. 


Make your self a basic bread/pizza dough. Knead together three and a half cups of strong flour, 1 teaspoon of salt, two tablespoons of olive oil or EVOO if you're a Rachael Ray fan, and 1 and a half teaspoons of dried yeast that has been growing in 1 and 1/4 cups of warm water with 1 teaspoon sugar. 


Let it grow in a bowl until it's doubled in size and then roll out into a decent sized rectangle. Smother with any delicious fixin's you are fond of. We put down tomato paste, salami, mozzarella, red onion, fresh basil, a little grate of parmesan cheese and salt and pepper. 


Roll into an enticing log shape and cook til golden in a 175c oven - about 20 minutes. Eat when still molten and while dreaming of your next adventure in log cookery. 


Thursday 25 August 2011

Back in time travel

I guess in some way I have always (maybe a bit more now) loved the romantic idea of being whisked away on an adventure of mass proportions. Trudging through land I have never trudged, seeing sights my eyes have never viewed. Generally I am not picky - a suburb next door or what seems to be a million hour drive - I just like to get away. I wish I had this same zest for the travel when I was an angst filled teenager being carted around on family tours. My parents would try and take my sister and I on a road trip most summers. This one year we went to pick up my sister who had gone away a few weeks earlier with another family, my parents thought it would be awesome to go on a longer, more beautiful, more eye appealing way - I was fully against this. I pretended to be asleep in the back seat the whole way. I could hear my mom yell out with delight at one point, "Look Janel, the Rockies!". I could barely muster up the energy to look out the side window and with every ounce of bad attitude and hatred for all things that made other people enjoy themselves - the only reply I could free from my lips was, "Ugh." and probably a faint "Humph".


Maybe my guilt for not being a decent travel companion in my teenage years is what has made me lust for the make up of lost world viewing time. I really wish I could see more than I do, be on one of the planes that thunder  from the runway moments away from my house, be the jerk on the highway pulling the sloth like caravan with no rear vision. I really wish I could be the person that won the lottery. 


When I did my last rearrangement of furniture I found I was left with two beaten up old suitcases filled with DVD's and nowhere to home them. 


I also found that I had a large empty cinder-block wall with nothing to hang upon it. I did some thinking and poking and prodding and found a way to suspend my old suitcases to magically turn them into shelves (after removing the lids as suggested by my ingenious red bearded husband). I stabbed some nails into the moulding along the upper half of the wall and attached some wire to them and to the handles of the suitcases. The bottoms of the cases needed a bit of support so we attached a piece of wire from the bottom up to the nail as well. I filled them with love and failed knitting and am more than stoked with the way they turned out.


Sunday 21 August 2011

I'm 31 - let's get fat!

Thirty-one years of my life will be celebrated tomorrow. Thirty-one years of a life well lived - a life well loved. I have travelled a little, I have experienced a little more and I have loved every little bump and struggle in my road of life. My choice to move countries broke many hearts, including my own. But it was a chance I hastily took and a chance that proved to be one that I will never regret. I have become an honest married woman, birthed a rad little being, and finally feel like I am coming into my own. My creative juices have surfaced and I am doing my best to hone in my craft(s). 


Luckily for my colleagues at work one of my dabbled in crafts is baking. There is a little tradition at my work that I still don't fully understand - your birthday so you bring the cake...for everyone. I don't really mind because it's an excuse for me to make something tasty and to not devour it all on my lonesome. I did put a little bit of extra time into this one. Made it special. Made it full of calories.    


Cinnamon buns:


In a cup dissolve 7.5 ml of yeast and a teaspoon of sugar in a 1/4 of a cup warm water. Let it hang out for 5 minutes or so - it will get bubbly. 


While that's doing it's thing, throw these ingredients into the bowl of your mixer: 3/4 of a cup milk, four tablespoons butter, three egg yolks, one tablespoon orange zest, 1 and a 1/4 teaspoons salt and roughly 3 and a half cups of flour depending on the wetness of your dough (leave 1 cup aside and add a little at a time once you start mixing). Chuck the yeast into the bowl when it's ready and get your dough mix happening. When it's not sticky to the touch, it's ready. Give it a good knead on a floured surface then into a greased bowl to rise. Double it in size - 1 hour or so depending on how warm she gets. 


Once risen, roll out to form a rectangle. Brush with 2 tablespoons of melted butter and then sprinkle your filling over the top. Filling includes: half a cup of brown sugar, 3 teaspoons of cinnamon and 1 teaspoon of nutmeg. I like raisins, so they made an appearance plus some toasted pistachios. 


Roll this up into a long tube and cut into even chunks. I managed to get 20 buns. In a pot melt up 3/4 of a cup brown sugar, four tablespoons of butter and a 1/4 of a cup maple syrup. Pour this into the deep pan you are intending on using and sprinkle with more nuts, if you're keen. On top of the sugar syrup place your rolls swirly side up and pretty close together. Let them hang for ten minutes to puff up. Get them in a 180c oven for 30 minutes. Right when you take them out flip them over onto a baking tray or serving dish so the bottom now becomes your top. The syrup is super hot so be really careful! Next step is the best...EAT!